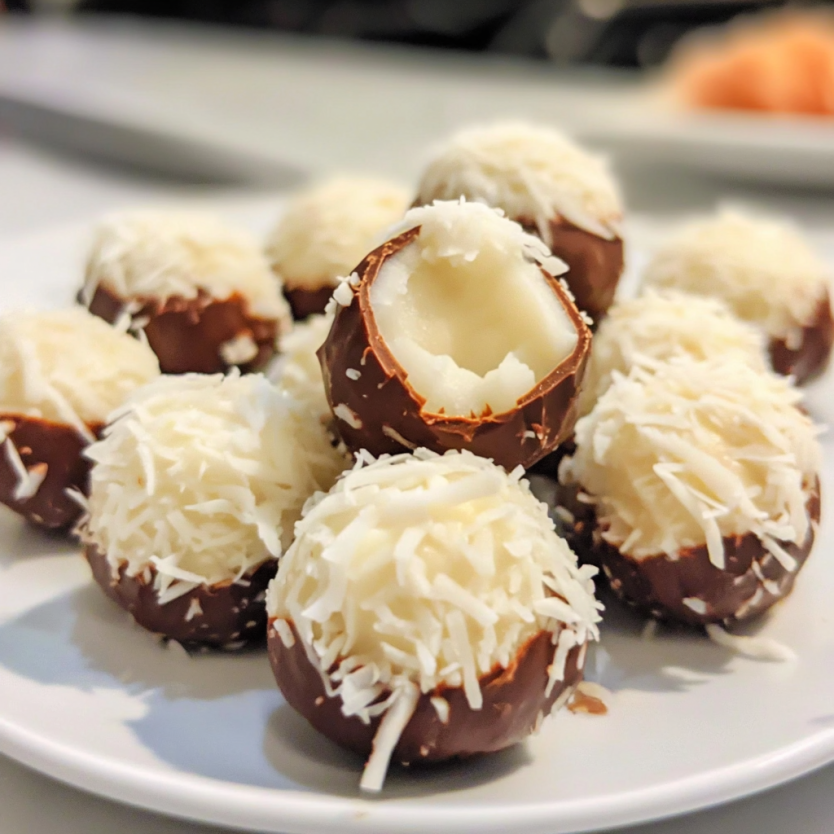
Coconut Bonbons
Coconut bonbons are a beloved confection, known for their creamy, chewy coconut center and smooth chocolate coating. These bite-sized treats strike the perfect balance between rich sweetness and tropical flavor, making them a favorite for holidays, special occasions, and everyday indulgence.
Unlike store-bought chocolates, homemade coconut bonbons offer superior taste and texture, as well as the ability to customize ingredients. Whether you prefer classic coconut bonbons, nut-filled variations, or boozy-infused versions, making them at home allows you to experiment with flavors, coatings, and decorative finishes.
This guide will take you through everything you need to know about crafting the perfect coconut bonbons. From selecting the best ingredients to troubleshooting common mistakes, you’ll learn how to make these decadent, handmade candies with ease.
Why Homemade Coconut Bonbons Are a Must-Try Treat
If you’ve never made bonbons before, you might wonder, “Why go through the trouble when I can just buy a box of chocolates?” The answer is simple: homemade is always better.
1. Better Ingredients, Better Taste
Store-bought bonbons often contain preservatives, artificial flavors, and excessive sugars, which can dull the natural flavors of coconut and chocolate. Homemade versions use pure, high-quality ingredients that result in a richer, more satisfying taste.
2. Fully Customizable Flavors
Unlike commercial chocolates that offer limited flavors, making your own bonbons means you can infuse them with unique flavors like:
- Vanilla, almond, or coconut extracts for extra depth.
- Liqueurs like rum, Irish cream, or Kahlua for a gourmet twist.
- Spices like cinnamon, nutmeg, or cayenne for an unexpected kick.
3. No Artificial Additives or Excess Sugar
Many mass-produced chocolates contain corn syrup, hydrogenated oils, and artificial stabilizers. Homemade coconut bonbons allow you to control the sweetness by using natural sweeteners or sugar alternatives.
4. Perfect for Gifting and Celebrations
Coconut bonbons make an elegant, homemade gift for birthdays, holidays, and special events. Packaged in a beautiful tin or box, they become a thoughtful, personalized present that anyone would love.
5. Fun and Easy to Make
Despite their gourmet appearance, coconut bonbons are surprisingly simple to make. With just a few ingredients and basic techniques, you can create a batch of professional-looking candies right in your kitchen.
Essential Tools and Equipment for Making Coconut Bonbons
1. Mixing Bowls
You’ll need a sturdy mixing bowl to combine the coconut filling. A large bowl makes mixing easier and ensures even distribution of ingredients.
2. Electric Hand Mixer or Stand Mixer
A mixer helps blend the ingredients into a smooth, creamy filling. If you don’t have one, a sturdy spoon and some elbow grease will also do the job.
3. Cookie Scoop or Spoon
A small cookie scoop or measuring spoon ensures that each bonbon is uniform in size, making them look professional and allowing for even chocolate coating.
4. Baking Sheet or Tray
A flat surface lined with parchment paper is essential for placing the bonbons before and after dipping them in chocolate.
5. Double Boiler or Microwave-Safe Bowl
Melting chocolate requires gentle heat. A double boiler (a heatproof bowl placed over simmering water) is the best method to melt chocolate evenly. If using a microwave, a glass or ceramic bowl is ideal.
6. Dipping Forks or Skewers
For a smooth, even chocolate coating, use a dipping fork or skewer to lower the bonbons into the melted chocolate. This prevents mess and gives them a beautiful, glossy finish.
7. Wax Paper or Parchment Paper
Placing bonbons on wax paper prevents sticking and makes cleanup easier.
Choosing the Best Ingredients for Coconut Bonbons
The quality of your ingredients will determine the flavor and texture of your coconut bonbons. Using fresh, high-quality ingredients makes a significant difference in the final product.
1. Selecting the Right Coconut
Coconut is the star ingredient, so choosing the best type is crucial.
- Sweetened Shredded Coconut – The most common choice, adds sweetness and chewiness.
- Unsweetened Coconut Flakes – Works well if you prefer less sweetness or plan to add a natural sweetener.
- Desiccated Coconut – Finely ground and absorbs liquid well, making for a denser, smoother filling.
2. Best Chocolate for Coating
The type of chocolate you choose affects the taste and texture of your bonbons.
- Dark Chocolate (60-70% cocoa) – Provides a rich contrast to the sweet coconut filling.
- Milk Chocolate – A traditional option that offers a classic candy flavor.
- White Chocolate – Adds a creamy, vanilla-like sweetness.
- Tempered Chocolate vs. Un-Tempered Chocolate – Tempering chocolate ensures a glossy finish and firm snap, while untempered chocolate may develop a dull appearance over time.
3. The Best Sweeteners and Binders
- Sweetened Condensed Milk – The most common binder, creates a creamy, rich filling.
- Powdered Sugar – Helps bind the coconut mixture while keeping it light.
- Honey or Maple Syrup – Natural sweeteners that add a subtle flavor twist.
4. Flavor Enhancers and Add-Ins
- Vanilla Extract – A simple yet effective way to enhance the sweetness.
- Almond or Coconut Extract – Adds a bold, nutty depth.
- Rum or Kahlua – For a boozy, gourmet touch.
- Chopped Nuts (Almonds, Pecans, Walnuts) – For added texture and crunch.
Step-by-Step Guide to Making Classic Coconut Bonbons
Ingredients:
- 2 cups sweetened shredded coconut
- 1 cup powdered sugar
- ½ cup sweetened condensed milk
- 1 teaspoon vanilla extract
- 1 ½ cups melted chocolate (dark, milk, or white)
Instructions:
1: Mixing the Coconut Filling
- In a large bowl, combine shredded coconut, powdered sugar, and condensed milk.
- Add vanilla extract and mix until well combined.
- If the mixture is too sticky, refrigerate for 10-15 minutes to firm up.
2: Shaping the Bonbons
- Use a cookie scoop or small spoon to scoop portions of the mixture.
- Roll each portion into a smooth ball using your hands.
- Place the bonbons on a lined baking sheet and refrigerate for at least 30 minutes.
3: Melting the Chocolate
- Melt chocolate using a double boiler or microwave in 30-second intervals, stirring until smooth.
- If desired, add a teaspoon of coconut oil for a thinner, silkier coating.
4: Coating the Bonbons
- Using a fork or skewer, dip each coconut ball into the melted chocolate.
- Allow excess chocolate to drip off before placing the bonbons on parchment paper.
- If decorating, sprinkle with coconut flakes, sea salt, or drizzle with extra chocolate before the coating sets.
5: Letting the Bonbons Set
- Allow the chocolate to set at room temperature or refrigerate for 15-20 minutes.
- Once hardened, transfer to an airtight container for storage.
Coconut bonbons are deceptively easy to make, yet they look and taste like a gourmet confectionery treat. With simple ingredients, basic techniques, and a little creativity, you can customize flavors, textures, and coatings to make them uniquely yours.
Beyond their customizability, coconut bonbons can be used for a variety of occasions—from holiday gift boxes to dessert platters and party favors. Whether you want a healthier version, a nut-studded variation, or a boozy bonbon with a kick, this guide will take your coconut bonbons to the next level.
Exploring Different Variations of Coconut Bonbons
The beauty of coconut bonbons is their adaptability. Small changes in ingredients, coatings, or preparation techniques can yield entirely new flavor experiences.
1. Classic vs. Modern Coconut Bonbons
Traditional coconut bonbons rely on shredded coconut, condensed milk, powdered sugar, and chocolate coating. Modern variations incorporate higher-quality ingredients, different sweeteners, and more advanced techniques to create luxurious and unique flavors.
- Traditional Style: Sweetened coconut, vanilla extract, milk chocolate coating.
- Modern Gourmet Style: Organic coconut, dark chocolate, sea salt, coconut cream instead of condensed milk.
2. Healthier Coconut Bonbons
For those who want a lighter, more natural version of coconut bonbons, certain modifications can reduce sugar content and processed ingredients while maintaining a rich, indulgent taste.
Keto Coconut Bonbons
- Use unsweetened shredded coconut to avoid added sugars.
- Swap condensed milk for coconut cream or almond butter.
- Sweeten with erythritol or monk fruit instead of powdered sugar.
- Coat in sugar-free dark chocolate.
Vegan Coconut Bonbons
- Use coconut milk or maple syrup instead of condensed milk.
- Choose dairy-free chocolate chips for coating.
- Add plant-based protein powder to the coconut filling for extra nutrition.
Paleo Coconut Bonbons
- Sweeten with raw honey or date paste instead of refined sugar.
- Use dark chocolate with at least 70% cocoa content.
3. Nut-Stuffed Coconut Bonbons
Adding nuts to the filling or placing them in the center of each bonbon provides a satisfying crunch and added richness.
- Almond Joy-Inspired Bonbons: Place a whole almond in the center before coating in chocolate.
- Pecan Coconut Bonbons: Mix chopped pecans into the coconut filling for a nutty texture.
- Hazelnut Coconut Bonbons: A hazelnut at the core creates a Ferrero Rocher-style bonbon.
4. Boozy Coconut Bonbons for Adults
For a grown-up twist, infusing coconut bonbons with liqueurs or spirits creates a decadent, sophisticated flavor.
- Rum-Infused Coconut Bonbons: Blend in a teaspoon of dark rum or coconut rum.
- Bailey’s Irish Cream Bonbons: Add Bailey’s to the coconut mixture for a creamy, smooth taste.
- Grand Marnier Coconut Bonbons: Infuse with orange liqueur for a citrusy chocolate flavor.
5. White Chocolate Coconut Bonbons
For those who love a creamier, milder chocolate taste, white chocolate creates a sweet and visually stunning alternative.
- Coat coconut bonbons in white chocolate for a vanilla-sweet flavor.
- Add freeze-dried raspberry powder to white chocolate for a fruity touch.
- Blend shredded coconut with melted white chocolate for a smooth, truffle-like consistency.
6. Spiced or Exotic Coconut Bonbons
Adding spices or exotic ingredients can elevate coconut bonbons into a more complex and gourmet treat.
- Cinnamon-Spiced Coconut Bonbons: Add a dash of cinnamon and nutmeg to the filling.
- Chili Chocolate Bonbons: Sprinkle a pinch of cayenne or chili powder into the melted chocolate for a spicy kick.
- Matcha Coconut Bonbons: Mix matcha powder into white chocolate for a green tea twist.
Creative Ways to Use Coconut Bonbons
Coconut bonbons aren’t just a standalone treat—they can be incorporated into various desserts, presentations, and culinary experiences.
1. Holiday and Gift Ideas
Homemade coconut bonbons make an elegant and personal gift for holidays, birthdays, and celebrations.
- Place bonbons in decorative tins or glass jars with ribbons for festive packaging.
- Pair with homemade cookies or truffles in a gourmet candy box.
- Add a hand-written recipe card for a thoughtful touch.
2. Dessert Platters and Party Trays
Coconut bonbons can be the star of a dessert platter when combined with other bite-sized sweets.
- Serve alongside truffles, fudge, and chocolate-dipped fruit for a variety of flavors.
- Offer different types of bonbons (dark chocolate, white chocolate, nut-filled) on a single tray.
- Arrange in mini cupcake liners for an elegant presentation.
3. Cake and Cupcake Decorations
Using coconut bonbons as a topping for cakes and cupcakes adds a luxurious, textured garnish.
- Place a bonbon on top of cupcakes for a beautiful centerpiece.
- Press bonbons into a frosted cake for a decorative, edible design.
4. Coffee and Hot Chocolate Pairings
Pairing coconut bonbons with a warm drink creates a perfectly indulgent moment.
- Serve bonbons with espresso or cappuccino for a balanced contrast of flavors.
- Dunk bonbons into hot chocolate for a melted coconut-chocolate experience.
5. Ice Cream and Frozen Desserts
Coconut bonbons pair well with frozen treats, adding a burst of texture and flavor.
- Chop bonbons into small pieces and mix into vanilla ice cream.
- Use as a topping for milkshakes or sundaes.
Nutritional Benefits of Coconut Bonbons
While coconut bonbons are considered a treat, they also contain nutritional benefits, especially when made with wholesome ingredients.
1. Coconut’s Health Benefits
- Rich in fiber – Supports digestion and gut health.
- Healthy fats – Contains medium-chain triglycerides (MCTs) that provide quick energy.
- Good source of minerals – Provides iron, potassium, and magnesium.
2. Dark Chocolate’s Antioxidants
- High in flavonoids, which support heart health.
- May reduce inflammation and improve circulation.
3. Homemade Bonbons Avoid Processed Ingredients
- No artificial additives or preservatives.
- Control over sugar content with natural sweeteners.
- Option to use dairy-free chocolate for a plant-based version.
Homemade coconut bonbons are one of the most delightful, customizable, and elegant treats you can make. Whether you prefer them classic, nut-stuffed, boozy, or coated in different chocolates, there are endless ways to tailor them to your taste.
Homemade coconut bonbons are a simple yet indulgent treat, but like any confection, they can sometimes be challenging to perfect. Whether your bonbons melt too quickly, are too soft, have an uneven chocolate coating, or crack after dipping, understanding how to fix these common issues is essential for achieving a smooth, professional finish.
Beyond troubleshooting, knowing the best way to store coconut bonbons ensures they stay fresh and delicious for as long as possible. Whether you’re making them in advance for a special occasion, gifting them, or freezing them for future enjoyment, proper storage is key.
This section covers expert tips, common mistakes, advanced chocolate-coating techniques, and frequently asked questions so that you can master the art of making coconut bonbons with confidence.
Troubleshooting Common Coconut Bonbon Mistakes
Even though coconut bonbons are relatively easy to make, small errors in preparation can affect their texture, flavor, or appearance. Here’s how to troubleshoot and improve your bonbons.
1. Bonbons Are Too Soft and Don’t Hold Their Shape
Cause: The coconut filling is too wet or the mixture is not firm enough.
Solution:
- Chill the mixture longer before shaping the bonbons. Refrigerate for at least 30 minutes or freeze for 15 minutes.
- Add extra shredded coconut or powdered sugar to absorb moisture and create a firmer texture.
- Use coconut flour instead of powdered sugar for a less sweet, firmer filling.
- Reduce the amount of condensed milk if the mixture feels too sticky.
2. Bonbons Are Too Dry or Crumbly
Cause: Not enough binding ingredients or overuse of dry ingredients.
Solution:
- Add a little extra sweetened condensed milk or coconut cream to increase moisture.
- Mix in a teaspoon of melted coconut oil for extra richness.
- Let the mixture rest for 5-10 minutes before rolling, allowing the coconut to absorb the liquid evenly.
3. Chocolate Coating is Too Thick or Uneven
Cause: Chocolate wasn’t properly melted or tempered before dipping.
Solution:
- Use a double boiler or microwave in 30-second intervals, stirring constantly to achieve a smooth, pourable consistency.
- Thin the chocolate with ½ teaspoon of coconut oil to make dipping easier.
- Ensure bonbons are well-chilled before dipping so the chocolate sets evenly.
- Use a dipping fork or skewer to gently tap off excess chocolate before placing on parchment paper.
4. Chocolate Coating Cracks or Separates After Hardening
Cause: The bonbons were too cold when dipped, or the chocolate cooled too quickly.
Solution:
- Let chilled bonbons sit for 5 minutes at room temperature before dipping to prevent temperature shock.
- If using tempered chocolate, ensure it’s at the correct working temperature (88-90°F for dark chocolate, 86-88°F for milk chocolate, and 82-84°F for white chocolate).
- Avoid over-dipping—a thin layer of chocolate is better than a thick, brittle coating.
5. Chocolate Melts Too Quickly After Setting
Cause: Chocolate wasn’t tempered or was stored in a warm environment.
Solution:
- Use tempered chocolate for a stable finish that resists melting at room temperature.
- If using untempered chocolate, store bonbons in the fridge until ready to serve.
- Add a small amount of cocoa butter or coconut oil to stabilize the chocolate.
6. Bonbons Stick to the Parchment Paper or Each Other
Cause: Chocolate was too warm when placed on parchment, or bonbons weren’t spaced apart.
Solution:
- Let excess chocolate drip off before placing on the parchment paper.
- Lightly grease the parchment paper with coconut oil if sticking is an issue.
- Space bonbons at least 1 inch apart so they don’t touch while setting.
How to Store Coconut Bonbons for Maximum Freshness
Proper storage ensures that homemade coconut bonbons maintain their flavor, texture, and freshness.
1. Storing at Room Temperature
- If the chocolate is properly tempered, bonbons can be stored at room temperature in an airtight container for up to a week.
- Keep them in a cool, dry place away from sunlight and heat sources to prevent melting.
2. Refrigerating Coconut Bonbons
- If using untempered chocolate or coconut oil in the coating, bonbons should be refrigerated.
- Store in an airtight container with parchment paper between layers to prevent sticking.
- Best consumed within 2 weeks for optimal freshness.
3. Freezing Coconut Bonbons
- Coconut bonbons freeze exceptionally well, making them perfect for advance preparation.
- Place bonbons in a single layer on a baking sheet, freeze until firm, then transfer to a ziplock bag or airtight container.
- Store for up to 3 months and thaw in the refrigerator before serving.
How to Reheat and Soften Coconut Bonbons
If refrigerated or frozen, bonbons may become too firm. Here’s how to bring them back to the right texture:
1. Bringing to Room Temperature
- Remove bonbons from the fridge and let them sit for 10-15 minutes before eating.
- This allows the chocolate to soften slightly for a smoother bite.
2. Softening in the Microwave
- If bonbons are too hard, microwave for 5-10 seconds on low power.
- Be careful not to overheat, as this can cause the chocolate to melt.
Frequently Asked Questions About Homemade Coconut Bonbons
1. Can I Make Coconut Bonbons Without Sweetened Condensed Milk?
Yes! Use coconut cream, honey, maple syrup, or almond butter as a natural binder.
2. What’s the Best Chocolate for Coating Bonbons?
- Dark chocolate (60-70% cocoa) provides a rich, slightly bitter contrast.
- Milk chocolate is smooth and creamy, ideal for a classic bonbon.
- White chocolate adds a vanilla-sweetness and pairs well with fruit flavors.
3. Can I Make Bonbons Without a Double Boiler?
Yes! Use a microwave to melt chocolate in 30-second intervals, stirring in between.
4. How Can I Make My Bonbons Extra Creamy?
- Blend the coconut filling with a small amount of coconut cream.
- Mix in a teaspoon of melted coconut oil for smoothness.
5. How Do I Make My Bonbons Look Professional?
- Use a dipping fork or skewer for clean, even chocolate coating.
- Drizzle with contrasting chocolate or sprinkle with shredded coconut for decoration.
- Use a silicone mold for perfectly round or square bonbons.
6. Can I Use a Sugar-Free Sweetener?
Yes! Use monk fruit, erythritol, or coconut sugar instead of powdered sugar.
Final Thoughts – Why Homemade Coconut Bonbons Are the Ultimate Treat
Homemade coconut bonbons are one of the most rewarding confections to make, offering endless customization options, rich flavor, and a gourmet appearance. By following the troubleshooting tips, proper storage methods, and expert chocolate-coating techniques, you’ll be able to create flawless bonbons every time.
Whether you’re making them for a holiday gift, a special occasion, or simply to satisfy your sweet tooth, coconut bonbons bring a touch of elegance and indulgence to any moment. Experiment with different flavors, coatings, and presentations, and most importantly—enjoy every bite of your handmade coconut delights!